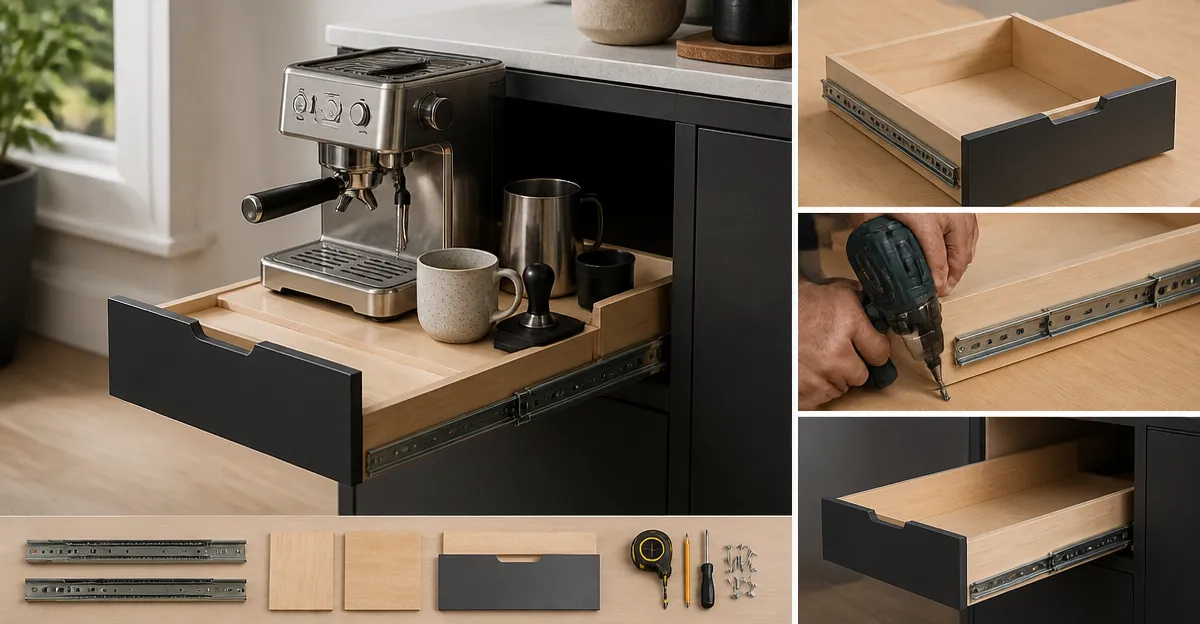
How to Build a Pull-Out Espresso Drawer for Small Kitchens — Step-by-Step Space-Saving DIY
Introduction
In compact kitchens, a dedicated espresso drawer can transform daily coffee rituals into a seamless experience. This guide explains how to design, cut, and install a pull‑out drawer that fits beneath a countertop or inside a narrow cabinet. Readers will learn measurement techniques, material selection, and finishing touches that enhance both functionality and aesthetics. By the end, one will possess a fully operational espresso station without sacrificing valuable countertop space.
What You'll Need
- Measuring tape, pencil, and carpenter's square for precise layout.
- 12‑inch Full Extension Drawer Slides – 12‑inch Full Extension Drawer Slides (price $13.41, rating 4.6/5 from 1,073 reviews). Ideal for cabinets with a depth of 12‑14 inches, offering 100 lb load capacity.
- 10‑inch Full Extension Drawer Slides – 10‑inch Full Extension Drawer Slides (price $9.90, rating 4.6/5 from 1,073 reviews). Suitable for shallower spaces, providing the same smooth glide and load rating.
- 1/2" plywood or MDF board for the drawer box, at least 0.75" thick.
- Wood screws, drill, and driver set.
- Rubber mute pads (included with slides) to reduce noise.
- Finish: paint, stain, or clear sealant to match existing cabinetry.
Step 1: Measure and Plan the Space
Begin by measuring the interior width, height, and depth of the target cabinet, allowing a 1/2" clearance on each side for smooth operation. Record the exact depth; this determines whether the 12‑inch or 10‑inch slide variant will be required. Sketch a simple diagram indicating the drawer front, side panels, and slide attachment points. Planning ahead prevents costly re‑cuts and ensures the espresso equipment will sit comfortably within the finished drawer.
Step 2: Cut the Drawer Components
Transfer the measurements onto the plywood or MDF board, marking the bottom, sides, back, and front panels. Use a table saw or circular saw to cut each piece, maintaining straight, clean edges for a professional appearance. Sand the cut edges lightly to remove splinters and prepare the surface for finishing. Assemble the box with wood glue and screws, confirming that the interior dimensions match the planned slide extension.
Step 3: Install the Drawer Slides
Attach the side‑mount slides to the interior sides of the cabinet first, aligning them with the top edge and ensuring a 0.5" side clearance as specified in the product instructions. Secure each slide with the eight screws provided, tightening evenly to avoid skewed movement. Next, mount the corresponding slide brackets to the drawer sides, using the detachable buckles for quick alignment. The ball‑bearing design of the 12‑inch Full Extension Drawer Slides or 10‑inch Full Extension Drawer Slides guarantees silent, smooth operation even under the weight of a coffee machine and accessories.
Step 4: Attach the Drawer Front and Handles
Measure the front opening of the drawer and cut a decorative front panel that aligns with the cabinet’s existing style. Drill pilot holes for the handle hardware, selecting a low‑profile pull that does not interfere with the slide’s travel. Mount the handle securely, then attach the front panel using concealed hinges or screws placed within the drawer’s interior. This step provides a polished look while preserving the drawer’s full‑extension capability.
Step 5: Finish and Install Coffee Equipment
Apply the chosen finish—paint, stain, or clear sealant—to all visible surfaces, allowing each coat to dry fully before handling. The finish not only protects the wood but also creates visual harmony with surrounding cabinets. Once dry, slide the drawer into place, confirming that it opens fully without binding. Finally, place the espresso machine, grinder, and accessories inside, ensuring the total load remains below the 100 lb rating of the selected slides.
Tips & Pro Tips
- Use a level during slide installation to prevent uneven movement that could cause premature wear.
- Apply a thin bead of silicone sealant along the drawer bottom to protect against moisture from spilled coffee.
- Consider adding a removable tray inside the drawer for easy cleaning of coffee grounds.
- If the cabinet depth exceeds 14", opt for the 12‑inch slides and add a short extension piece to maintain full extension.
Troubleshooting
Drawer sticks or squeaks: Verify that the slides are fully seated and that the rubber mute pads are correctly positioned. Tighten any loose screws and lubricate the ball bearings with a silicone‑based spray.
Insufficient load capacity: Re‑evaluate the combined weight of the espresso machine and accessories. If the load approaches 100 lb, consider reinforcing the drawer box with additional side braces.
Conclusion
By following this step‑by‑step guide, one can create a functional pull‑out espresso drawer that maximizes limited kitchen space while maintaining a sleek appearance. The recommended drawer slides provide reliable, silent operation and support heavy coffee equipment. With careful measurement, proper installation, and a thoughtful finish, the new drawer becomes a permanent, space‑saving feature. Readers are encouraged to apply these techniques to other small‑appliance storage projects for continued kitchen efficiency.
Products Mentioned in This Guide
Frequently Asked Questions
What measurements are critical when planning a pull‑out espresso drawer?
Measure the cabinet’s interior width, depth, and height, then subtract the slide clearance (typically ½‑inch) to size the drawer box correctly.
Which drawer slides are best for a small‑kitchen espresso drawer?
Full‑extension slides of 10‑12 inches are ideal, offering smooth access and up to 100 lb load capacity for coffee machines and accessories.
Can I use standard plywood for the drawer box?
Yes, ¾‑inch hardwood or plywood provides enough strength while keeping the drawer slim enough for tight spaces.
How do I ensure the drawer stays level during installation?
Use a carpenter’s square and a level to align the slides before fastening, and double‑check with a tape measure that both sides are equidistant from the cabinet walls.
What finishing touches improve the espresso drawer’s durability and look?
Apply a food‑safe sealant or paint, add soft‑close dampers, and install a recessed power outlet for easy plug‑in of the espresso machine.