How to Build a Fold-Down Wall Espresso Station for Tiny Kitchens — Step‑by‑Step Space‑Saving DIY
Introduction
Living in a tiny kitchen often means sacrificing the luxury of a dedicated coffee corner. This guide teaches readers how to create a fold‑down espresso station that maximizes vertical space while keeping essential equipment within arm's reach. By the end of the project, one will have a functional, stylish coffee hub that folds away when not in use, preserving valuable countertop real estate. The instructions combine basic carpentry with carefully chosen tools that simplify installation and enhance durability.
What You’ll Need
- BAYKA Floating Bathroom Shelves – Set of 4, $19.98, 4.6/5 rating (6,645 reviews)
- De'Longhi Stilosa Manual Espresso Machine – 4.2/5 rating (13,678 reviews)
- CERA+ Portable Electric Espresso Maker – $139.99, 4.4/5 rating (288 reviews)
- Stud finder, level, drill, screwdriver set
- Wood screws (1½" to 2"), wall anchors for drywall
- Mounting brackets (optional for extra support)
- Cable management clips
- Finishing touches: decorative trim, paint or stain
Step 1: Plan the Layout
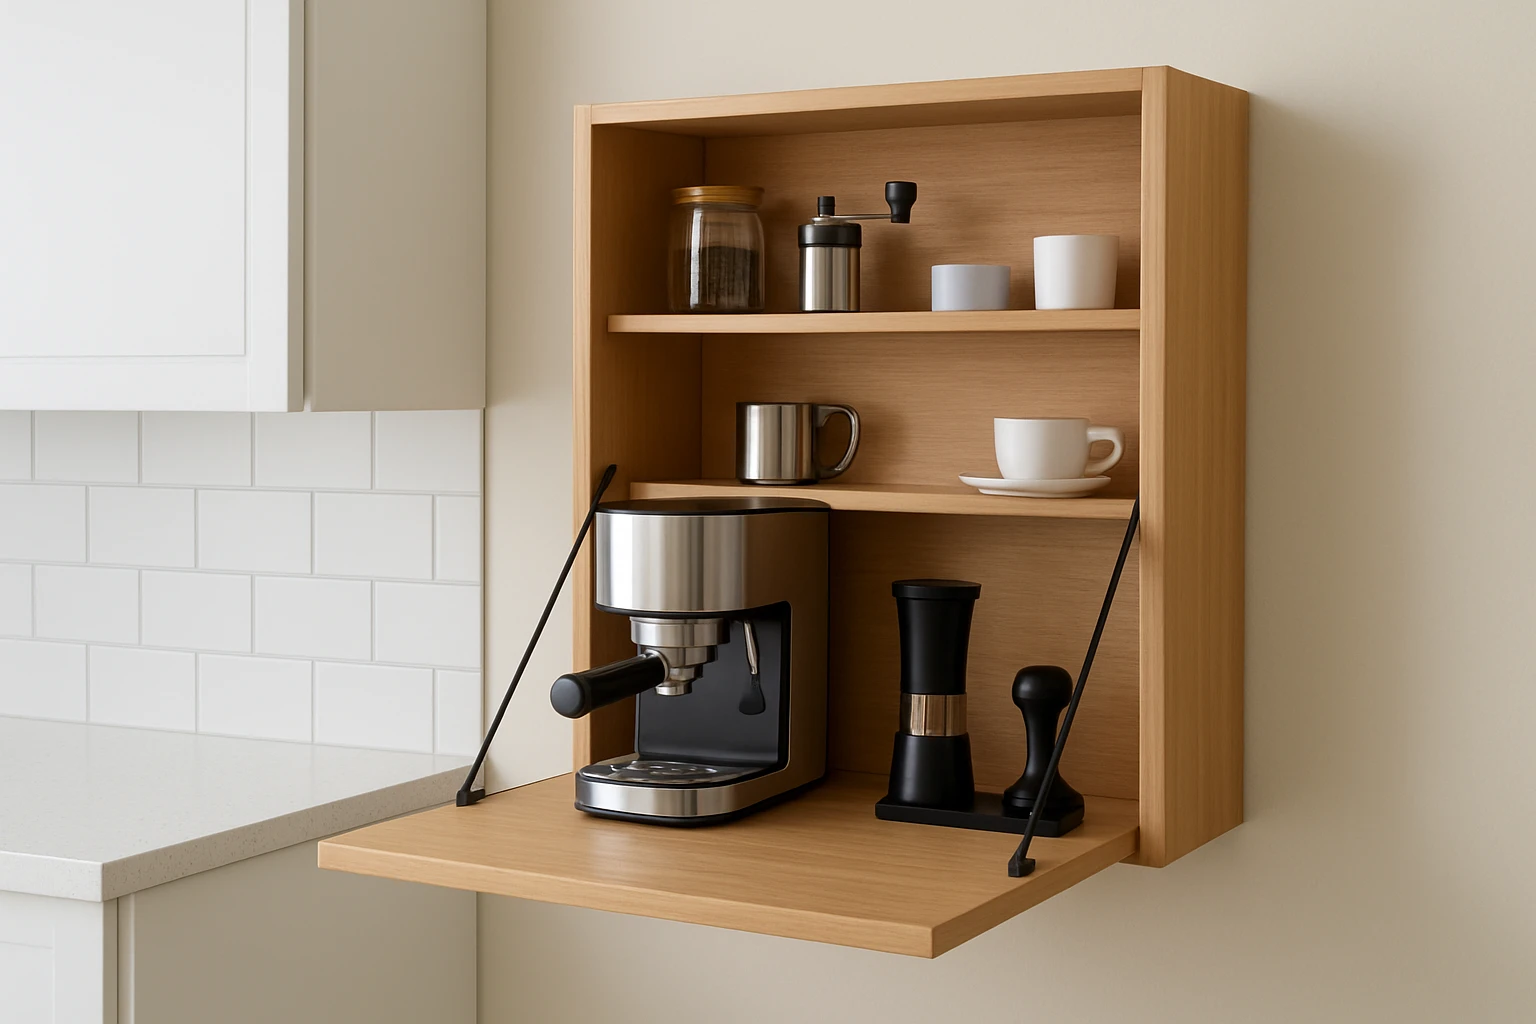
Begin by measuring the wall space above the countertop, noting the distance from the floor to the nearest cabinet. Sketch a layout that positions the largest shelf at eye level for the espresso machine, with smaller shelves below for mugs, beans, and accessories. Ensure the fold‑down mechanism will clear the countertop when opened; a 12‑inch clearance is generally sufficient for a standard espresso machine. This planning stage prevents costly adjustments later and guarantees a harmonious flow between cooking and coffee‑making zones.
Step 2: Install the Floating Shelves
Mount the BAYKA Floating Bathroom Shelves set, which includes three sizes that interlock to form a tiered rack. The shelves are crafted from lightweight paulownia wood, offering a 30% weight reduction compared with oak while retaining strength; each shelf supports up to 40 lb, more than enough for an espresso machine and accessories. Use a stud finder to locate studs, then drill pilot holes and secure the brackets with the supplied hardware. The triangular frame design distributes weight evenly, reducing the risk of sagging over time.
Why choose these shelves? Their rustic finish blends with most kitchen decors, and the set provides a ready‑made hierarchy that eliminates the need for custom cutting. The included installation hardware works with drywall, studs, or concrete, making the system suitable for renters and homeowners alike.
Step 3: Prepare Electrical Access
Both the De'Longhi Stilosa and the CERA+ models require a standard 120 V outlet. Locate an outlet within two feet of the intended shelf position to avoid long cords. If the outlet is not conveniently placed, install a recessed power strip behind the shelf, using cable management clips to keep cords tidy. For the CERA+, note its USB‑C charging capability; a USB‑C wall adapter can be mounted nearby for quick recharging between uses.
Safety tip: Turn off power at the circuit breaker before drilling into walls, and ensure all cords are rated for kitchen use to prevent fire hazards.
Step 4: Position the De'Longhi Stilosa Manual Espresso Machine
Place the De'Longhi Stilosa Manual Espresso Machine on the middle shelf, which offers the optimal height for ergonomics. This compact machine delivers 15 bar pump pressure and includes a manual steam wand for frothing milk, making it ideal for single‑serve espresso, lattes, and cappuccinos. Its stainless‑steel boiler ensures longevity, and the included tamper and measuring scoop simplify the brewing process.
The manual nature of the Stilosa provides greater control over extraction compared with fully automatic machines, which is advantageous in a small kitchen where precision outweighs convenience. Its footprint fits comfortably within the 14.2‑inch width of the medium shelf, leaving room for a small grinder or a jar of beans.
Step 5: Add the CERA+ Portable Electric Espresso Maker for On‑The‑Go Use
Install the CERA+ Portable Electric Espresso Maker on the lower shelf or keep it in a drawer for travel. Weighing only 1.6 lb, this device is ultra‑portable and features a 20‑bar pump that produces crema‑rich espresso in under three minutes. Its self‑heating capability eliminates the need for a separate kettle, and the USB‑C recharge system restores full power in two hours.
Having a portable unit alongside a full‑size machine offers flexibility: one can brew a quick shot at the office or while camping without sacrificing quality. The CERA+ also accepts both Nespresso‑compatible pods and ground coffee, catering to diverse preferences.
Step 6: Create a Fold‑Down Mechanism
Attach sturdy piano hinges to the bottom edge of the middle shelf, allowing the entire espresso station to pivot upward when not in use. Secure the hinge to the wall studs using the same wood screws used for the shelves. When folded, the shelf rests flush against the wall, and a magnetic catch can hold it in place. This mechanism transforms a permanent countertop fixture into a retractable workspace, preserving valuable surface area for cooking.
Test the movement several times to ensure smooth operation; lubricate the hinge with a silicone spray if necessary. The triangular frame of the BAYKA shelves adds rigidity, preventing wobble during repeated folding cycles.
Step 7: Finish and Personalize
Apply a coat of clear polyurethane or a matching paint to protect the paulownia wood from kitchen humidity. Add decorative trim or a small backsplash behind the station to integrate it visually with the surrounding cabinetry. Arrange mugs, a bean jar, and a small grinder on the lower shelf for a complete coffee bar look. Finally, label the power strip and USB‑C charger for easy identification.
These finishing touches elevate the station from a purely functional construct to a design element that reflects personal style while maintaining practicality.
Tips & Pro Tips
- Use a level when installing each shelf to avoid a tilted espresso machine, which can affect extraction consistency.
- Consider adding a small LED strip under the shelves for ambient lighting and better visibility during early morning brews.
- Secure the espresso machine with anti‑vibration pads to reduce noise and protect the countertop from minor impacts.
- When using the CERA+ on the go, keep the battery fully charged to avoid reduced pressure output.
- Periodically tighten all screws, as repeated folding can loosen hardware over time.
Troubleshooting
Shelf Sagging: If the middle shelf begins to dip under the weight of the De'Longhi, add additional wall anchors or a hidden support bracket beneath the shelf.
Power Issues: Ensure the outlet is GFCI‑protected and that cords are not pinched by the folding hinge. Replace any frayed cables immediately.
Inconsistent Espresso Pressure: Check the water hardness and clean the De'Longhi's boiler regularly; mineral buildup can lower pump efficiency.
Conclusion
By following these steps, one can transform a modest wall into a fully functional, fold‑down espresso station that respects the constraints of a tiny kitchen. The combination of sturdy BAYKA floating shelves, a reliable De'Longhi manual espresso machine, and the versatile CERA+ portable maker provides a comprehensive coffee solution for both home and travel. This DIY project not only saves space but also enhances the aesthetic appeal of the kitchen, encouraging daily ritual and hospitality.
Products Mentioned in This Guide
Frequently Asked Questions
What basic tools are required to build a fold‑down wall espresso station?
You need a drill, level, stud finder, screws, brackets, and a saw for cutting the shelf to size.
Can I use any floating shelf for the espresso station, or is a specific product recommended?
The guide recommends BAYKA Floating Bathroom Shelves for their sturdy design and easy mounting.
How does a fold‑down espresso station save countertop space in a tiny kitchen?
It folds up against the wall when not in use, freeing the countertop for other tasks while keeping the machine within arm’s reach.
Is the fold‑down mechanism safe for heavy espresso machines?
Yes, when securely anchored to wall studs with heavy‑duty brackets, the shelf can support most standard home espresso machines.
What maintenance steps should I follow to keep the fold‑down station durable?
Periodically tighten screws, check bracket integrity, and clean the shelf surface to prevent moisture buildup.