Introduction
Creating café‑quality espresso at home often requires a stable water connection, but many renters or apartment dwellers cannot modify walls or countertops. This guide explains how to install a compact countertop espresso machine without drilling, using portable adapters, flexible tubing, and strategic placement. Readers will learn how to position the machine, connect it to a water source, secure power, and perform initial testing while preserving the integrity of their living space. The method is valuable because it avoids permanent alterations, reduces installation cost, and enables quick removal when moving. By following the steps, one can enjoy reliable espresso extraction and milk frothing without compromising landlord requirements.
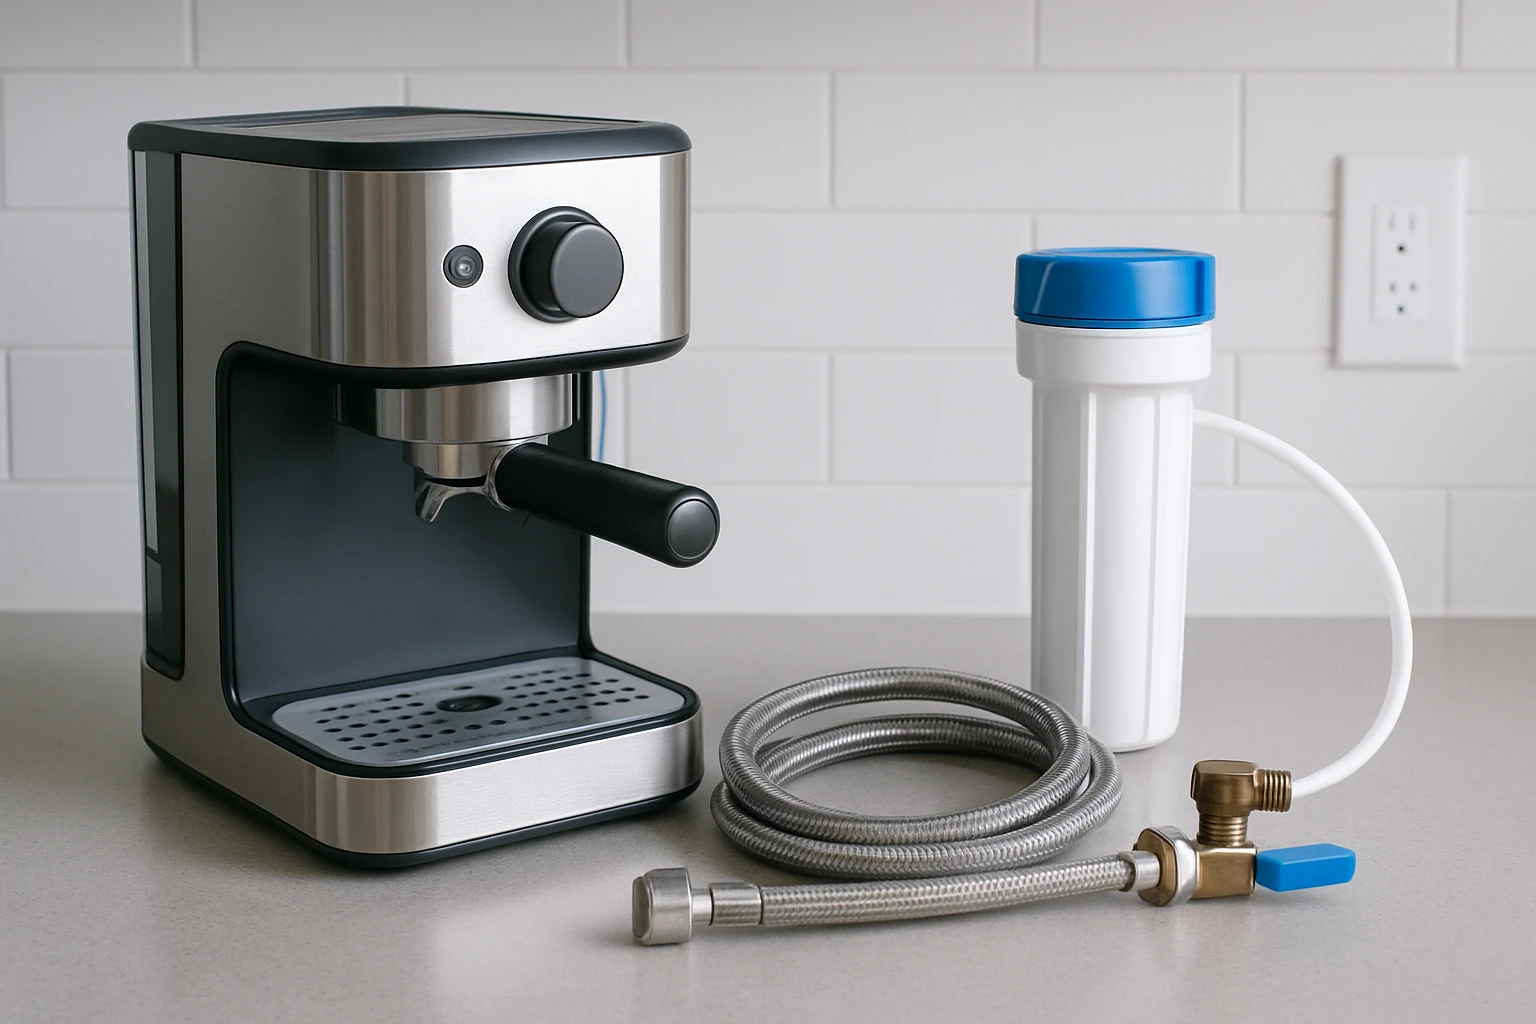
What You’ll Need
- Compact countertop espresso machine (choose one of the recommended models below)
- Portable countertop water adapter with a 1/4•NPT hose
- Food‑grade silicone tubing (length based on kitchen layout)
- Adjustable wrench and hose clamps
- Non‑slip silicone mat for machine stability
- Electrical surge protector with grounded outlet
- Micro‑fiber cleaning cloth and mild descaling solution
Step 1: Position the Machine on a Stable Surface
Select a countertop area that offers easy access to a water faucet, a power outlet, and sufficient clearance for the drip tray. Place a non‑slip silicone mat to prevent the unit from sliding during operation. For renters who seek a reliable entry‑level option, the AYCHIRO Semi‑Auto Espresso Machine provides a compact footprint, a removable water tank, and a stainless‑steel finish that complements modern kitchens. Priced at $79.99 with a perfect 5‑star rating from 17 reviews, this model combines a 20‑bar pump and a detachable steam wand, making it ideal for the no‑drill setup. Ensure the machine sits level; use a spirit level if necessary.
Step 2: Connect the Water Supply Using a Countertop Adapter
Instead of hard‑piping, attach a portable countertop water adapter to the faucet. The adapter converts the standard spout into a 1/4•NPT outlet compatible with espresso machine inlet hoses. Secure the adapter with the supplied tightening knob, then attach food‑grade silicone tubing to the adapter using an adjustable wrench and hose clamp. Route the tubing to the machine’s water inlet, ensuring there are no kinks that could restrict flow. The AYCHIRO machine features a removable water tank, but connecting directly to the faucet eliminates the need for frequent refilling and provides consistent pressure for optimal extraction.
Step 3: Attach the Milk Frothing System
Most compact machines include a detachable steam wand. For the AYCHIRO Semi‑Auto Espresso Machine, remove the wand from its storage slot, then tighten the connection to the boiler using the supplied wrench. Verify that the wand is aligned vertically to prevent steam leakage. If you prefer a manual frothing experience, the De’Longhi Stilosa Espresso Maker offers a robust manual steam wand and includes a tamper for precise coffee puck compression. Priced at $99.95 with a 4.2‑star rating from over 13,600 reviews, the Stilosa provides a 15‑bar pump and a stainless‑steel boiler, making it a strong alternative for those who value manual control.
Step 4: Secure the Drip Tray and Waste Container
Place the drip tray on the silicone mat, aligning it with the machine’s outlet. The AYCHIRO model includes a detachable drip tray that slides into place without tools. Ensure the tray is seated fully to catch excess water and coffee grounds. For models with larger water tanks, such as the CHULUX Slim Espresso Machine Creamy, the 40‑oz reservoir reduces the frequency of refilling, but the drip tray remains essential for clean operation. This CHULUX unit is priced at $99.98 and holds a 4.5‑star rating from 1,005 reviews, offering a pressure gauge and pre‑infusion function that benefit precise brewing.
Step 5: Set Up the Power Connection Safely
Plug the machine into a surge protector rather than directly into the wall outlet. This protects the electronics from voltage spikes and provides a convenient on/off switch. Verify that the outlet is grounded; use a multimeter if uncertain. The AYCHIRO machine consumes moderate power and includes an automatic shut‑off after 25 minutes of inactivity, enhancing safety. Position the power cord behind the silicone mat to avoid tripping hazards. If you opt for the CASABREWS 20 Bar Espresso Machine, note that its 1350‑W boiler requires a dedicated 120‑V circuit for optimal performance. Priced at $118.99 with a 4.4‑star rating from 7,704 reviews, the CASABREWS model includes a 34‑oz removable water tank and a pressure gauge for precise adjustments.
Step 6: Test Extraction and Adjust Pressure
Run a water‑only cycle to purge air from the lines. Fill the machine’s reservoir or ensure the faucet connection is open, then activate the brew cycle without coffee grounds. Observe the pressure gauge (available on CHULUX and CASABREWS models) and listen for steady flow. If pressure is low, tighten the hose clamps or check for kinks in the tubing. Once the system is stable, grind fresh coffee beans to a fine consistency, tamp evenly, and brew a test shot. Evaluate the crema thickness and flavor balance; adjust grind size or tamp pressure as needed. The De’Longhi Stilosa allows manual tamping, which can fine‑tune extraction for single or double shots.
Step 7: Maintain and Clean Without Drilling
Regular maintenance preserves machine performance. After each use, empty the drip tray, rinse the removable water tank, and wipe the exterior with a micro‑fiber cloth. Perform a weekly descaling using a mild solution compatible with stainless‑steel boilers; the AYCHIRO and CHULUX models feature detachable boilers that simplify cleaning. For the CASABREWS unit, remove the steam wand and clean the silicone seals to prevent buildup. Store the flexible tubing in a coil to avoid stress on the connectors. Because no permanent fixtures were installed, the entire setup can be disassembled and relocated without damage to the countertop.
Tips & Pro Tips
- Use a short length of tubing to reduce pressure loss; longer runs can diminish extraction quality.
- Secure the hose clamps with a torque wrench set to 15‑20 in‑lb to avoid over‑tightening.
- Place the silicone mat slightly larger than the machine footprint to catch any accidental spills.
- When using the steam wand, purge steam for 5 seconds before frothing to ensure consistent temperature.
- Keep a spare water filter cartridge on hand if your faucet water contains high mineral content.
Troubleshooting
No water flow: Check that the faucet adapter is fully opened and that the tubing is not kinked. Verify that hose clamps are snug but not crushing the tube.
Low pressure or weak crema: Inspect the pressure gauge; if reading below 18 bars, ensure the inlet hose is free of air bubbles and that the machine’s pump is not obstructed.
Steam wand leaking: Tighten the wand connection and ensure the gasket is seated correctly. Replace the gasket if it shows signs of wear.
Conclusion
By following this no‑drill method, one can install a compact countertop espresso machine safely, maintain consistent water pressure, and enjoy high‑quality espresso without permanent modifications. The guide highlighted essential tools, step‑by‑step actions, and product recommendations that simplify the process. Readers are encouraged to experiment with grind size, tamp pressure, and milk frothing techniques to perfect their coffee experience. When the lease ends or the kitchen layout changes, the entire system can be removed cleanly, preserving both the rental property and the user’s investment.
Products Mentioned in This Guide
Frequently Asked Questions
Can I connect a countertop espresso machine to a faucet without drilling?
Yes, a portable countertop water adapter with a 1/4" NPT hose and food‑grade silicone tubing lets you hook up to a faucet without any permanent modifications.
What type of tubing should I use for a non‑drilled installation?
Use food‑grade silicone tubing, which is flexible, safe for potable water, and easy to secure with hose clamps.
How do I keep the espresso machine stable on a countertop?
Place a non‑slip silicone mat under the machine and ensure the hose and adapter are positioned to prevent tipping.
Is a surge protector necessary for a countertop espresso machine?
A grounded surge protector protects the machine from voltage spikes and provides a safe, single‑plug power source.
Can I remove the setup easily when I move?
All components—adapter, tubing, clamps, and mat—are detachable, allowing quick disassembly without damage to walls or countertops.