How to Soundproof a Cabinet for a Compact Espresso Machine: 7 DIY Space‑Saving Ideas to Cut Noise
Introduction
Many coffee enthusiasts place a compact espresso machine on a kitchen countertop or within a small cabinet. While the device produces delightful aromas, its pump and boiler generate a noticeable hum that can disturb a quiet morning routine. This guide teaches the reader how to reduce that noise by applying proven acoustic techniques. By following seven practical steps, one can create a quieter brewing environment without sacrificing countertop space or aesthetics.
The instructions combine basic handyman skills with targeted product recommendations. Even readers who prefer to use existing household materials will find value, because each step explains why a specific tool or material improves sound attenuation.
What You’ll Need
- Measuring tape and pencil
- Utility knife or scissors
- Adhesive‑backed acoustic panels (Junwisun Hexagon Acoustic Panels)
- Mass loaded vinyl (MLV) soundproof pads (WVOVW Mass Loaded Vinyl Soundproof Pads)
- Self‑adhesive acoustic tiles (Lebenforce Acoustic Panels)
- Weather‑strip foam tape for doors
- Silicone caulk
- Small screwdriver set
Step 1: Assess the Cabinet and Identify Noise Paths
Begin by removing the espresso machine from the cabinet and inspecting the interior. Use a measuring tape to record the width, height, and depth of the cavity. Identify any gaps where sound can escape: the door seam, vent openings, and screw holes. Note that low‑frequency vibrations travel through solid structures, while higher frequencies leak through air gaps. Understanding these pathways informs the selection of the most effective materials in later steps.
Step 2: Seal All Gaps and Air Leaks
Apply a thin bead of silicone caulk around the door frame, vent edges, and any visible cracks. For removable doors, install weather‑strip foam tape along the perimeter to create an airtight seal when the door is closed. This simple barrier can reduce airborne noise transmission by up to 30 % according to acoustic engineering studies. Allow the caulk to cure for at least 24 hours before proceeding.
Step 3: Add Mass with MLV Pads
Mass loaded vinyl is a dense, flexible material that blocks sound by adding inertia to the cabinet walls. Cut the WVOVW Mass Loaded Vinyl Soundproof Pads to fit the interior surfaces of the cabinet. Each pad measures 1/8 inch thick and has a surface density of 1.25 lb/ft², providing triple the insulation of standard 0.05‑inch pads. The product is rated 5 stars by five reviewers and costs $39.99.
Secure the pads with the supplied nails, ensuring minimal damage to the cabinet’s finish. The nails act as tackers, holding the vinyl in place while preserving the ability to remove the pads later if needed. The added mass dampens low‑frequency vibrations from the pump, which are the most audible component of espresso machine noise.
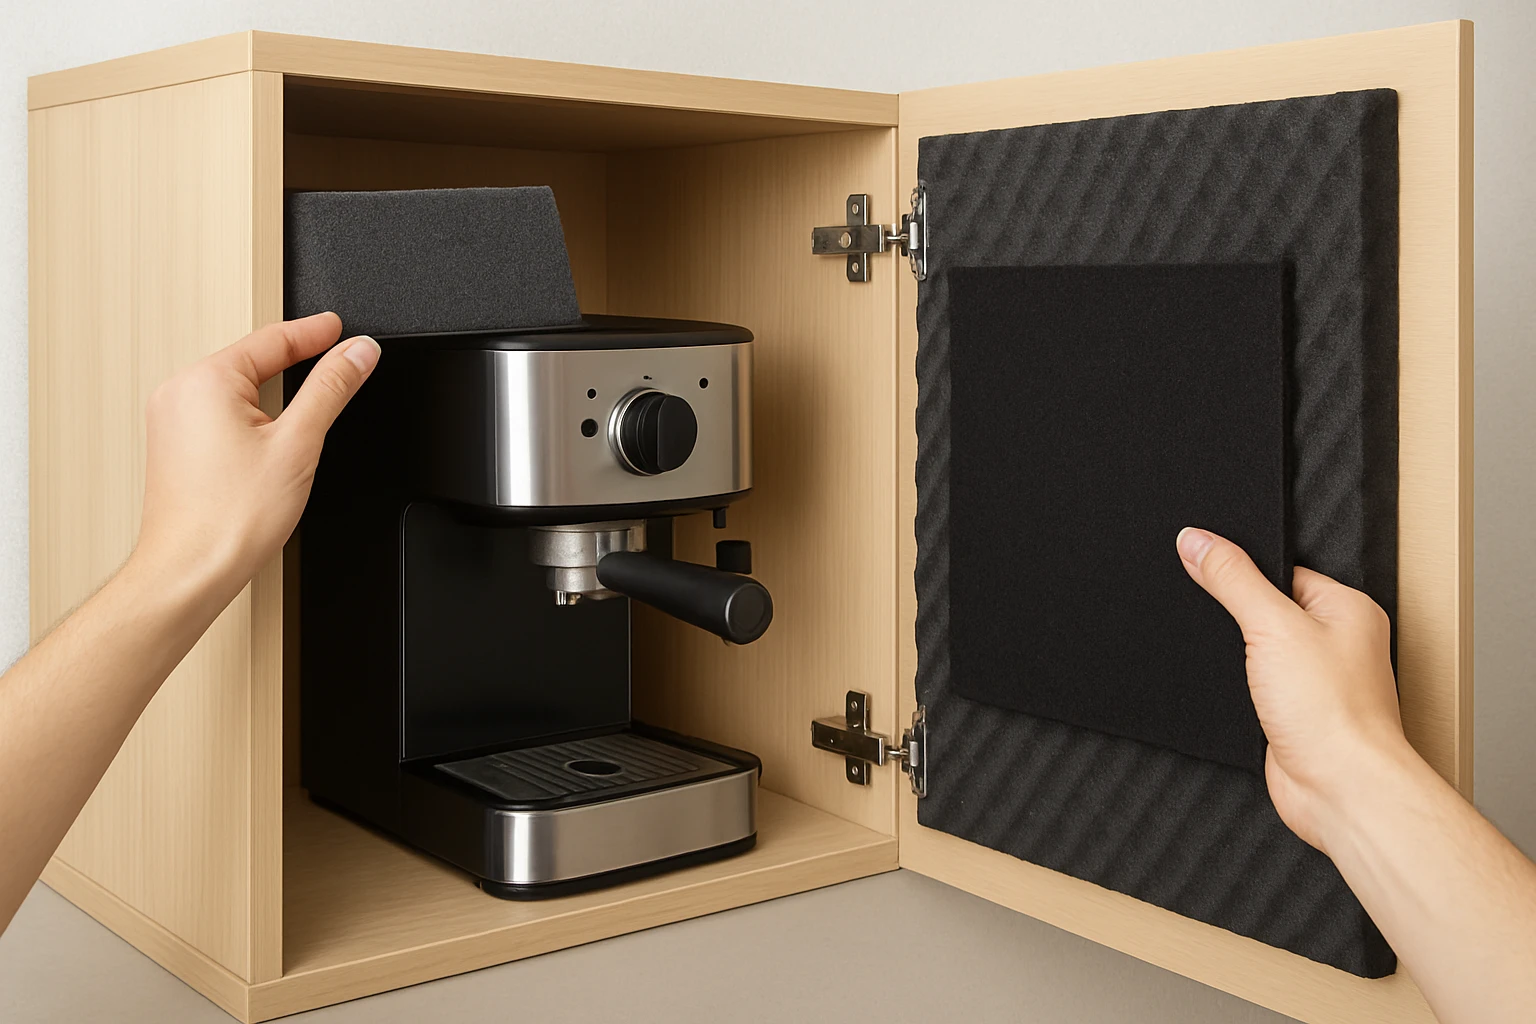
Step 4: Install Hexagon Acoustic Panels on the Interior Walls
After the MLV layer, attach the Junwisun Hexagon Acoustic Panels to the cabinet’s interior. These panels feature a high‑density 9.4 lb/ft³ PET foam core and a self‑adhesive backing that eliminates the need for additional glue or tools. Each 12‑pack covers approximately 7.5 sq ft and costs $26.99, with a perfect 5‑star rating from eleven reviewers.
The hexagonal shape and beveled edges provide both acoustic absorption and visual appeal. Position the panels in a staggered pattern to avoid dead spots and to maximize surface area. The panels absorb mid‑to‑high‑frequency sounds generated by the steam wand and water pump, reducing echo within the confined cabinet space.
Step 5: Apply a Secondary Layer of Self‑Adhesive Tiles
For added refinement, line the back wall of the cabinet with Lebenforce Acoustic Panels. These 12" × 12" tiles are made from premium polyester fiber, offering high‑density sound absorption comparable to professional studio treatment. The 22‑pack retails for $71.99 and holds a 4.5‑star rating from 351 reviewers.
Because the tiles are self‑adhesive, they can be applied directly over the Junwisun panels without additional hardware. This layered approach creates a gradient of absorption: the MLV blocks low frequencies, the Junwisun panels tame mids, and the Lebenforce tiles capture the remaining high frequencies. The result is a balanced acoustic environment that minimizes reverberation inside the cabinet.
Step 6: Upgrade the Cabinet Door with a Sound‑Dampening Seal
Even with interior treatment, sound can escape through the door. Attach a thin strip of acoustic foam or additional weather‑strip tape around the door’s edge. If the door is solid wood, consider adding a thin layer of the Junwisun panels to its interior surface, securing them with the existing self‑adhesive backing. This extra barrier prevents the pump’s vibration from transmitting directly to the room.
Test the door closure after installation; a snug fit without rattling indicates an effective seal. The combination of mass, absorption, and airtightness dramatically reduces the perceived noise level when the espresso machine operates.
Step 7: Test, Fine‑Tune, and Enjoy a Quieter Brew
Reinstall the espresso machine and run a short brewing cycle. Listen from various points in the kitchen to gauge the reduction in noise. If certain frequencies remain prominent, add a few extra Junwisun panels to the most reflective spots identified during the test. Small adjustments, such as tightening door seals or adding a thin MLV strip behind the machine’s base, can yield noticeable improvements.
Document the final configuration for future reference, especially if the cabinet is later repurposed. The modular nature of the recommended products allows for easy removal or re‑arrangement without damaging the cabinet.
Tips & Pro Tips
- Measure twice, cut once. Precise cuts of MLV and panels ensure full coverage and a professional appearance.
- Ventilation matters. If the espresso machine requires airflow, install a small acoustic vent covered with a fine‑mesh screen to maintain sound control while allowing heat dissipation.
- Use a level. When applying self‑adhesive panels, a level guarantees even placement and prevents gaps that could let sound escape.
- Combine materials wisely. Mass (MLV) blocks low frequencies, while porous foam (Junwisun) and fiber panels (Lebenforce) absorb mids and highs. Skipping any layer reduces overall effectiveness.
- Safety first. Wear gloves when handling MLV pads, as the dense vinyl can be sharp at the edges.
Troubleshooting
| Problem | Possible Cause | Solution |
|---|---|---|
| Residual humming after installation | Insufficient mass on one side of the cabinet | Add an extra strip of MLV to the opposite wall. |
| Echo inside the cabinet | Missing acoustic panels on a corner | Place additional Junwisun panels in the corner to break standing waves. |
| Door does not close properly | Weather‑strip tape too thick | Trim the tape or use a thinner foam seal. |
Conclusion
By following these seven steps, the reader can transform a noisy cabinet into a quiet, efficient enclosure for a compact espresso machine. The guide demonstrates how mass, airtight sealing, and layered acoustic absorption work together to attenuate sound. Whether one chooses to purchase the recommended products or substitute comparable household items, the underlying principles remain the same: block low frequencies, absorb mids and highs, and eliminate air leaks.
Implementing these techniques not only improves the coffee‑making experience but also contributes to a more peaceful kitchen environment for everyone.
Products Mentioned in This Guide
Frequently Asked Questions
What materials are best for soundproofing a cabinet around a compact espresso machine?
Mass loaded vinyl, acoustic foam panels, and dense rubber mats are most effective because they add mass and absorb vibrations.
Can I soundproof the cabinet using only household items?
Yes, thick moving blankets, carpet remnants, and weather‑stripping can reduce noise when layered inside the cabinet.
How do I prevent the espresso machine’s vibration from transmitting through the countertop?
Place a vibration‑isolating rubber mat or silicone pad under the machine before installing it in the cabinet.
Do I need to cut openings in the cabinet doors for acoustic panels?
No, adhesive‑backed panels can be applied directly to the interior surfaces without cutting, preserving the cabinet’s appearance.
Will soundproofing affect the machine’s ventilation or heat dissipation?
Use breathable acoustic panels and leave ventilation gaps; ensure the machine’s exhaust vents remain unobstructed to avoid overheating.