How to Froth Milk with a Small Espresso Machine: Step‑by‑Step Guide to Barista‑Quality Microfoam at Home
This guide explains how to produce velvety microfoam using a compact espresso machine. The reader will learn the physics of steam, the importance of milk temperature, and the precise technique required for latte‑style drinks. Mastering this skill enables the preparation of café‑standard beverages without leaving the kitchen. The information is valuable for both beginners and those who already own a small machine but seek consistency.
What You’ll Need
- Fresh whole milk or a high‑fat alternative (minimum 3.5% fat for optimal foam).
- A small espresso machine with a steam wand. Recommended options are the Casabrews CM5418 Espresso Machine (Blue) or the Casabrews CM5418 Espresso Machine (Silver). For users who prefer an integrated grinder, the Gevi 20 Bar Espresso Machine with Grinder is an excellent choice.
- A stainless‑steel frothing pitcher (12‑oz capacity works well for two drinks).
- A thermometer (optional but helpful for temperature control).
- A tamper and portafilter if espresso extraction is part of the workflow.
Step 1 – Prepare the Milk
Begin by pouring cold, fresh milk into the frothing pitcher. Fill the pitcher no higher than the base of the steam wand; this provides enough space for the milk to expand by at least 30 percent. Cold milk contains more dissolved air, which the steam will incorporate to create microbubbles. For latte art, whole milk yields the richest, glossy foam, while oat or soy milk can be used for dairy‑free alternatives, though the texture may differ slightly.
Step 2 – Preheat the Espresso Machine
Activate the machine and allow the boiler to reach its operating pressure. The Casabrews CM5418 Espresso Machine (Blue) reaches 20 bar pressure within minutes thanks to its 1350 W motor, ensuring a stable steam output. The built‑in pressure gauge displays the exact pressure, allowing the user to verify that the machine is ready before frothing. Consistent boiler temperature reduces the risk of scalding the milk, which would destroy the delicate microfoam structure.
Step 3 – Purge the Steam Wand
Before introducing milk, release a short burst of steam to expel any residual water. This step prevents unwanted dilution of the milk and guarantees a dry wand, which is essential for creating fine bubbles. Hold a cloth over the wand to protect your hand from the hot steam. The purge also confirms that the machine’s over‑heat protection is not engaged, a feature highlighted in the Casabrews user guide.
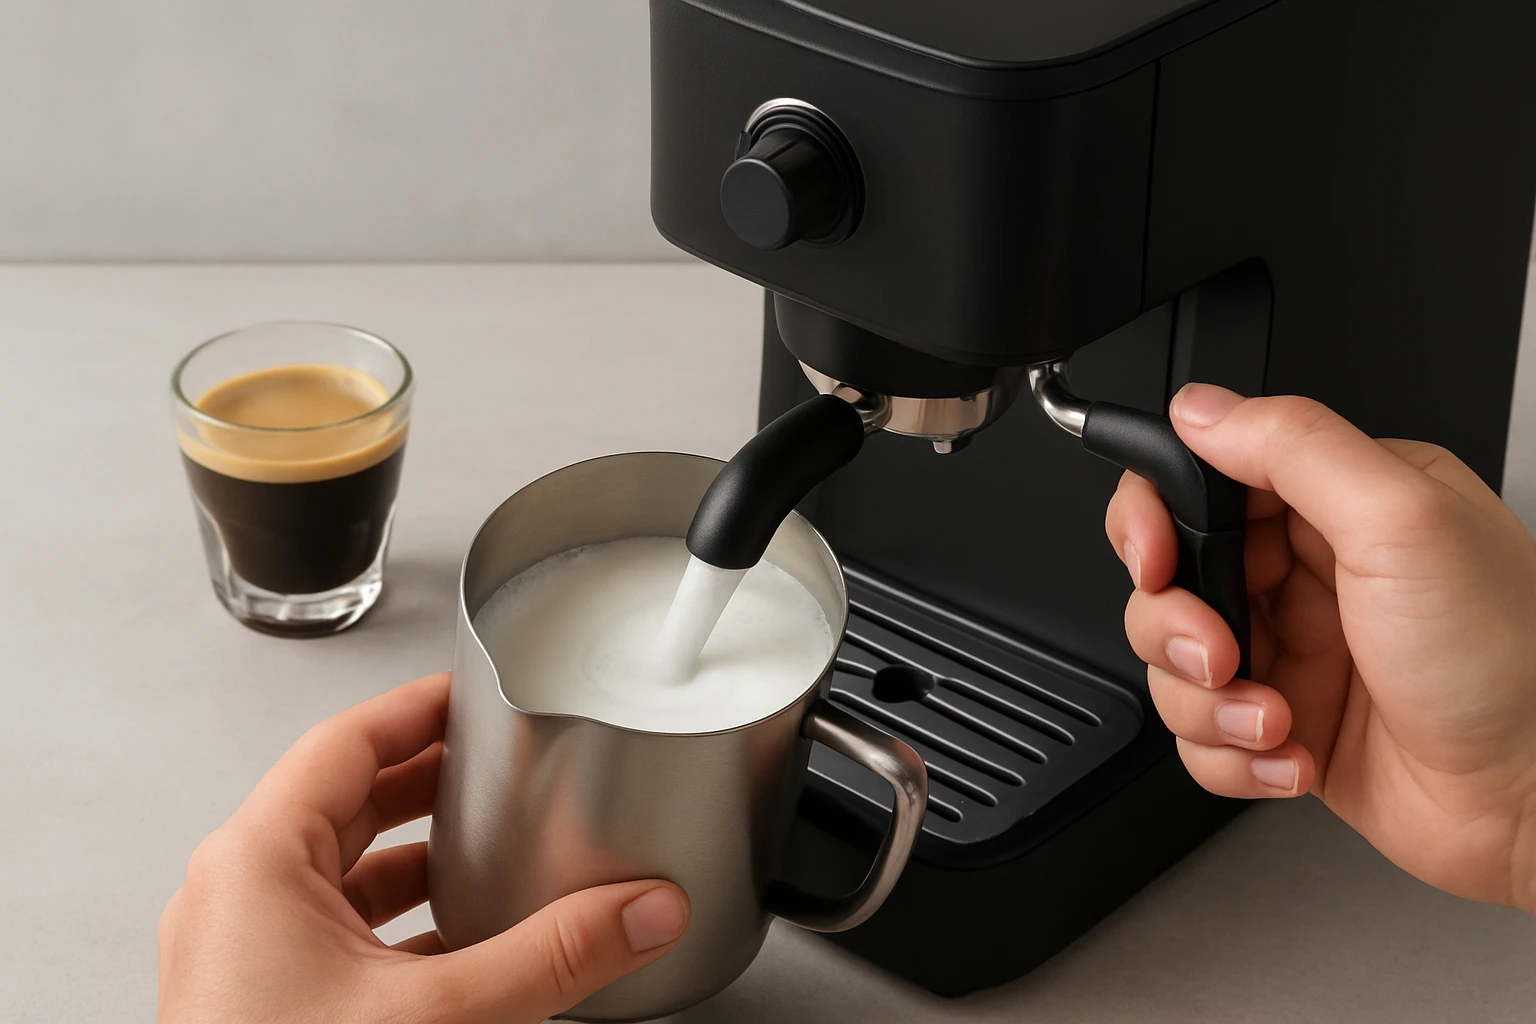
Step 4 – Position the Steam Wand
Insert the wand tip just below the surface of the milk, angled slightly toward the pitcher wall. The tip should be positioned at the depth where a gentle “chirping” sound is heard; this indicates that air is being drawn into the milk. Maintaining this position for the first few seconds creates a thin layer of foam known as “stretching.” After the milk volume increases, lower the wand deeper to continue heating without adding more air. The Gevi machine’s high‑pressure steam wand offers precise control, making it easier to achieve a consistent stretch‑phase.
Step 5 – Stretch the Milk
Turn the steam knob to full power and listen for the characteristic hissing. In the first 5‑7 seconds, keep the wand near the surface to incorporate air. The milk should double in volume and develop a silky, velvety texture. Avoid large bubbles; if they appear, gently tap the pitcher on the counter and swirl to collapse them. The Casabrews steam wand produces a strong, steady flow, which is ideal for this phase.
Step 6 – Heat the Milk
After the stretch phase, lower the wand deeper so that the tip is fully submerged. Continue steaming until the milk reaches 55‑60 °C (130‑140 °F). Using a thermometer helps maintain this range; overheating beyond 65 °C will cause the proteins to denature, resulting in a thin, watery foam. The Gevi machine’s NTC & PID temperature control automatically stabilizes the boiler, allowing the user to focus on technique rather than temperature guessing.
Step 7 – Polish the Foam
Turn off the steam and remove the pitcher. Give the pitcher a firm, circular swirl for 2‑3 seconds; this aligns the microbubbles and creates a glossy surface. A quick tap on the counter releases any remaining large bubbles. The final foam should have a glossy sheen and a texture comparable to wet paint. This polished microfoam is the foundation for latte art and a smooth mouthfeel.
Step 8 – Combine with Espresso
If the workflow includes pulling a shot, use the same machine’s portafilter and tamper. The 20 bar pressure of the Casabrews or Gevi machines extracts a balanced espresso with a thick crema, which anchors the milk foam. Pour the espresso into a pre‑warmed cup, then gently pour the microfoam, starting from the center and moving outward to create a classic latte or a more intricate rosette.
Tips & Pro Tips
- Always use fresh, cold milk; reheated milk loses its ability to form stable microfoam.
- For dairy‑free options, choose barista‑style oat milk, which contains added fats to mimic dairy foam.
- Practice the “taper” technique: gradually lower the wand as the milk expands to avoid over‑aeration.
- Maintain the steam wand after each use by wiping it with a damp cloth and briefly purging steam to prevent milk residue buildup.
- If the machine displays an overheating warning, allow it to cool for several minutes before attempting another froth cycle; the Casabrews models include an automatic protection mode that flashes the cup indicator.
Troubleshooting
| Problem | Possible Cause | Solution |
|---|---|---|
| Milk does not expand | Steam wand tip is too deep or steam pressure is low. | Raise the wand tip just below the surface and ensure the boiler has reached full pressure; the pressure gauge should read near 20 bar. |
| Large bubbles persist | Excessive air introduced or insufficient swirling. | Tap the pitcher and swirl vigorously; reduce the time the wand spends at the surface. |
| Milk tastes burnt | Temperature exceeded 65 °C. | Use a thermometer and stop steaming once the target temperature is reached; the Gevi PID system can be set to stop automatically. |
| Steam wand sputters water | Residual water in the boiler. | Purge the wand for a few seconds before frothing; repeat if necessary. |
Conclusion
By following these eight steps, the reader can consistently produce barista‑quality microfoam using a compact espresso machine. Understanding the relationship between steam pressure, milk temperature, and technique is essential for achieving a glossy, velvety texture. The recommended machines—Casabrews CM5418 in blue or silver and the Gevi 20 Bar Espresso Machine with Grinder—provide reliable steam performance and temperature stability, making them ideal tools for home baristas. Practice regularly, maintain the equipment, and the reader will enjoy café‑standard lattes, cappuccinos, and latte art from the comfort of the kitchen.
Products Mentioned in This Guide
Frequently Asked Questions
What type of milk creates the best microfoam on a small espresso machine?
Whole milk or any high‑fat alternative (at least 3.5% fat) produces the richest, velvety foam.
What temperature should milk reach for optimal frothing?
Heat the milk to 55‑65 °C (130‑149 °F); hotter milk burns and loses sweetness.
How do I properly use the steam wand on a compact espresso machine?
Position the wand just below the surface, turn on steam, and create a gentle whirl while gradually lowering the pitcher to incorporate air.
Can I froth milk without an integrated grinder on a small machine?
Yes, the steam wand works independently; just ensure the machine is fully heated before steaming.
How should I clean the steam wand after frothing to maintain performance?
Wipe it immediately with a damp cloth and purge steam for a few seconds to remove milk residue.