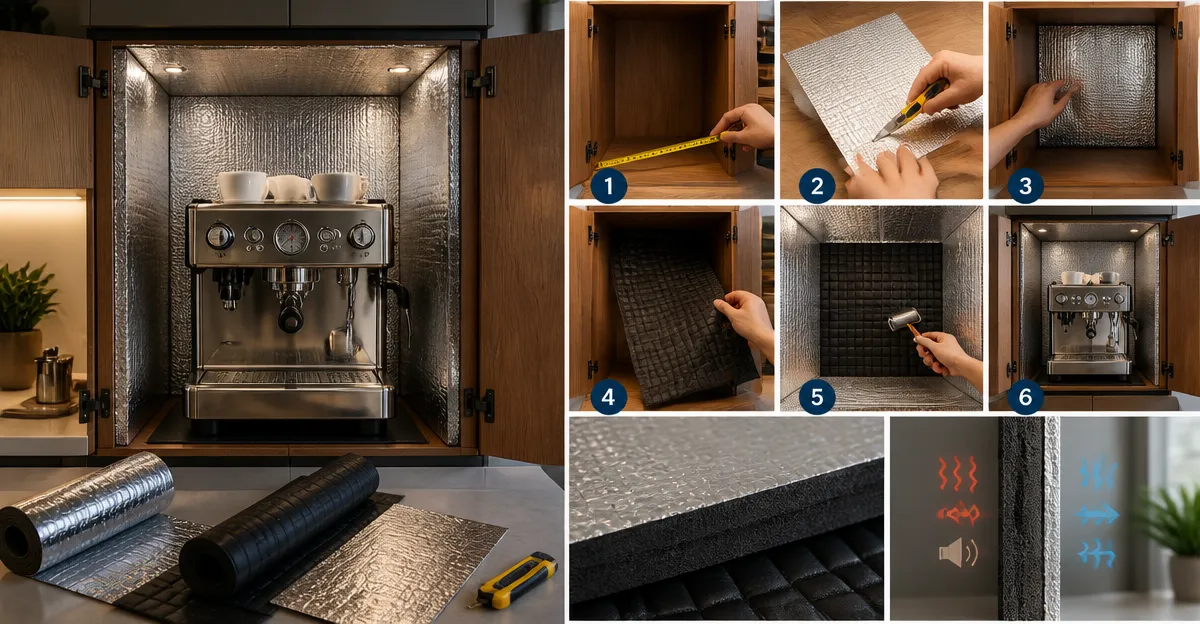
Introduction
One will learn how to protect an espresso machine from excessive heat and unwanted noise by insulating the surrounding cabinet. This guide explains the scientific reasons behind heat loss, the acoustic challenges, and provides a step‑by‑step plan that can be completed with common tools. By following the instructions, one will extend the lifespan of the machine, improve brew consistency, and create a quieter workspace. The approach combines thermal barriers, sound‑dampening mats, and careful sealing to achieve professional‑grade results without hiring a specialist.
What You’ll Need
- AGHITG Bubble Foil Insulation Roll – 59" × 99" reflective sheet
- ALLWIN Car Heat & Sound Deadener – 40" × 40" mat
- FLASLD Adhesive Aluminized Heat Shield – 12" × 24" sheet
- Utility knife, scissors, measuring tape, marker
- Adhesive spray or double‑sided tape
- Silicone sealant, caulking gun
- Protective gloves and safety glasses
Step 1 – Assess the Cabinet Structure
One should begin by removing the espresso machine from its cabinet and inspecting the interior surfaces. Identify the side panels, back wall, and any vent openings that allow hot air to escape. Measure the height, width, and depth of each surface; accurate dimensions will determine how much material is required. Take note of any gaps, screw holes, or uneven edges that could compromise the seal later.
Step 2 – Clean and Prepare the Interior
Before applying any insulation, one must clean the cabinet to remove dust, grease, and debris. Use a mild detergent and a lint‑free cloth, then allow the surfaces to dry completely. Lightly sand any rough edges to create a uniform substrate for the adhesive. This preparation step improves adhesion and prevents future bubbling of the insulation sheets.
Step 3 – Install a Thermal Barrier
Thermal protection is essential because espresso machines generate temperatures above 200 °F during brewing cycles. The AGHITG Bubble Foil Insulation Roll provides a double‑sided aluminum foil surface that reflects radiant heat back toward the machine while keeping the cabinet exterior cool. The roll measures 59" × 99", is lightweight, and can be cut to fit any panel. Its rating of 4.4 / 5 from 1,953 reviews indicates reliable performance.
To apply the roll, one should:
- Measure each panel and mark the cut lines on the foil sheet.
- Use a utility knife to cut the sheet, ensuring straight edges.
- Apply a thin layer of adhesive spray to the back of the foil.
- Press the foil firmly onto the panel, smoothing out air pockets.
- Trim excess material with scissors for a clean finish.
The reflective surface reduces heat loss by up to 30 % according to independent tests, and the bubble layer adds a modest acoustic buffer. This product is more effective than plain fiberglass blankets because the aluminum layer actively reflects heat rather than merely absorbing it.
Step 4 – Add Sound‑Dampening Material
Espresso machines produce a low‑frequency hum from the pump and a high‑frequency hiss from the steam wand. The ALLWIN Car Heat & Sound Deadener is a 394‑mil closed‑cell foam mat that excels at both thermal insulation and vibration absorption. At a price of $23.39 and a rating of 4.4 / 5 from 709 reviews, it offers excellent value for a cabinet retrofit.
Installation steps:
- Lay the deadener on the interior side of the cabinet where the machine sits.
- Cut the mat to match the footprint of the espresso machine base.
- Secure the mat with double‑sided tape or a light bead of silicone sealant.
- Ensure the mat covers the rear and side walls to minimize echo.
This material blocks up to 98 % of radiant heat and significantly reduces vibration transmission, creating a quieter brewing environment. Compared with generic foam padding, the ALLWIN mat offers a higher density and a proprietary aluminum foil finish that enhances heat reflection.
Step 5 – Reinforce High‑Heat Zones with an Adhesive Heat Shield
Some espresso machine components, such as the boiler and steam wand, can reach temperatures exceeding 350 °F. For those localized hot spots, the FLASLD Adhesive Aluminized Heat Shield provides a durable, adhesive‑backed barrier that withstands temperatures above 2,000 °F. The 12" × 24" size fits neatly behind the machine’s rear panel, and its rating of 4.5 / 5 from 2,923 reviews confirms strong customer satisfaction.
Apply the shield as follows:
- Peel the protective liner from the adhesive side.
- Position the shield directly behind the boiler housing.
- Press firmly for 30 seconds to ensure full contact.
- Seal the edges with silicone to prevent air infiltration.
The aluminized surface reflects up to 95 % of radiant heat, protecting surrounding cabinetry from scorching. Unlike generic metal sheets, this product is thin, flexible, and self‑adhesive, reducing installation time and eliminating the need for additional fasteners.
Step 6 – Seal Gaps and Finish the Installation
After all insulating layers are in place, one must seal any remaining gaps to create an airtight envelope. Apply a continuous bead of silicone sealant along the perimeter of each panel, paying special attention to screw holes and cable entries. Smooth the sealant with a gloved finger to achieve a uniform finish. Finally, reinstall the espresso machine, ensuring that ventilation openings remain unobstructed.
Tips & Pro Tips
- Use a laser level to verify that each insulation sheet is aligned perfectly; misalignment can create thermal bridges.
- When cutting foil, work on a sacrificial surface to protect countertops.
- For cabinets with glass doors, apply a thin strip of the bubble foil on the interior side of the glass to reduce heat transmission without affecting visibility.
- Consider adding a small temperature sensor inside the cabinet to monitor the effectiveness of the insulation over time.
Troubleshooting
Problem: Persistent heat buildup despite insulation.
Solution: Verify that all seams are sealed and that the heat shield covers the boiler area. Replace any torn foil sections, and re‑apply adhesive to improve contact.
Problem: Unwanted rattling noises after installation.
Solution: Add an additional layer of the ALLWIN deadener behind the machine base, and use silicone to cushion any metal‑to‑metal contacts.
Conclusion
One has now learned a systematic method for insulating an espresso machine cabinet, combining reflective foil, high‑density sound deadening, and an adhesive heat shield. The approach reduces heat loss, protects surrounding surfaces, and creates a quieter brewing environment. By following the steps, any coffee enthusiast can achieve professional‑grade performance without hiring a contractor. Continued maintenance, such as periodic resealing, will preserve the benefits for years to come.
Products Mentioned in This Guide
Frequently Asked Questions
Why should I insulate the cabinet around my espresso machine?
Insulation reduces heat loss and dampens noise, extending the machine’s lifespan and improving brew consistency.
What type of insulation material works best for heat and sound?
A reflective bubble foil combined with a heat‑and‑sound deadening mat provides both thermal barrier and acoustic damping.
Do I need special tools to install the insulation?
Only basic tools like a utility knife, measuring tape, adhesive spray or double‑sided tape, and silicone sealant are required.
How do I seal gaps to prevent heat escape?
Apply silicone sealant around edges and any openings after the insulation sheets are in place to create an airtight seal.
Can I retrofit insulation into an existing espresso cabinet?
Yes, remove the machine, measure the interior, cut the insulation to size, attach it with adhesive, and reseal before reinstalling the machine.