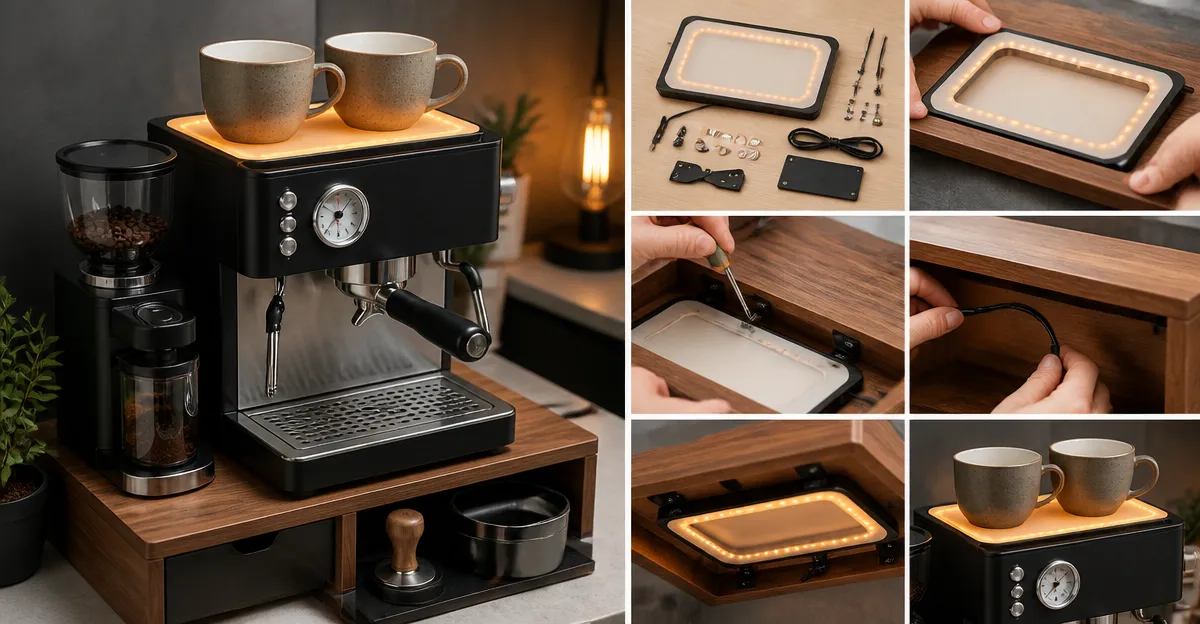
Introduction
Creating a compact espresso station at home offers both aesthetic appeal and functional convenience. One common shortcoming of small stations is the loss of heat from freshly brewed coffee while the barista prepares the next shot. Adding an LED cup warmer resolves this issue by maintaining beverage temperature and providing ambient illumination. This guide explains how to select, install, and optimise an LED cup warmer for a DIY espresso setup, ensuring safety, reliability, and visual charm.
What You'll Need
- LED‑enabled coffee mug warmer (recommended Kepwam Coffee Mug Warmer)
- Optional secondary warmer for backup heat (Bearwind Coffee Mug Warmer)
- Basic electrical tools: screwdriver, wire stripper, multimeter
- Heat‑resistant silicone pads or mounting brackets
- Power strip with surge protection
- Optional timer‑enabled warmer for precise control (KitchekShop Coffee Mug Warmer)
Step 1: Assess Placement and Power Availability
Begin by identifying a flat surface on the espresso station where the warmer will sit without obstructing the grinder, portafilter, or water reservoir. Measure the available width and depth; most LED warmers occupy a 4‑inch heating plate, which fits comfortably on a standard countertop. Verify that a power outlet is within reach of the warmer's cord, or plan to use a short extension cord rated for 120 V. Ensuring a stable, heat‑resistant base prevents wobble and protects surrounding wood or metal surfaces.
When the station is built from modular panels, consider mounting the warmer underneath a removable shelf to keep the top surface clear for cup placement. Use silicone pads to cushion the unit and to maintain an even heat distribution across the mug base. This preparation step reduces later adjustments and safeguards the espresso machine from accidental spills.
Step 2: Choose an LED Mug Warmer and Understand Its Features
The Kepwam Coffee Mug Warmer combines rapid heating with a built‑in LED night light that doubles as a temperature indicator. It offers three precise settings—131 °F, 150 °F, and 167 °F—allowing users to match the optimal serving temperature for espresso, latte, or Americano. The LED colors (blue, purple, red) correspond to each setting, providing visual confirmation without checking a digital display.
Key specifications include a 6‑hour automatic shut‑off, UL certification for safety, and a sleek wood‑grain finish that blends with most kitchen décor. Priced at $11.98 with a 4.3‑star rating from 679 reviews, it delivers excellent value for a compact espresso station. The unit's power cord measures 59 inches, offering flexibility in positioning while keeping the cord out of the way of foot traffic.
If a user prefers a wider temperature range, the MQUPIN Coffee Mug Warmer provides three settings from 113 °F to 167 °F and integrates a tri‑color LED system. Though slightly more expensive at $19.99, its microcrystalline glass panel resists scratches and spills, making it suitable for high‑traffic coffee corners.
Step 3: Prepare Electrical Connections Safely
Unplug the warmer before beginning any wiring work. Using a screwdriver, remove the protective cover on the power inlet if the design permits access to the internal wiring. Strip approximately ½ inch of insulation from the cord's ends and twist the copper strands to ensure a solid connection. Connect the live (black) and neutral (white) wires to the corresponding terminals on the warmer's internal connector, following the colour‑coded markings.
After reconnecting the cover, test the unit with a multimeter set to continuity mode to confirm that there are no short circuits. Once the test passes, plug the warmer into a surge‑protected power strip to guard against voltage spikes that could damage the LED circuitry. This precaution is especially important for espresso stations that often share power with grinders and brewing devices.
Step 4: Install the Warmer and Configure Temperature Settings
Place the warmer on the prepared silicone pads, aligning it with the chosen spot on the espresso station. Press the side buttons to select the desired temperature; the LED will illuminate in the colour matching the setting. For espresso, 150 °F (purple) maintains crema while preventing over‑extraction, whereas 167 °F (red) suits milk‑based drinks that benefit from higher heat.
To enhance safety, consider pairing the LED warmer with a timer‑enabled device such as the KitchekShop Coffee Mug Warmer. This unit offers four temperature levels up to 185 °F and a programmable 1‑12 hour timer, providing an additional layer of control when the espresso station is used for extended periods. The KitchekShop model is priced at $19.99 and holds a 4.6‑star rating from 3,909 reviewers, making it a reliable complement to the LED warmer.
If the primary LED warmer lacks a timer, the KitchekShop unit can be positioned beside the espresso machine to act as a backup heat source, ensuring that any cup left unattended remains warm without manual intervention.
Step 5: Integrate the Warmer with Your Espresso Workflow
With the warmer installed, adjust your espresso preparation routine to include the heated cup. After pulling a shot, place the cup directly on the LED plate; the gentle illumination adds a café‑like ambience while the heat preserves the beverage temperature. For latte art, the consistent warmth prevents the milk from cooling too quickly, allowing smoother pouring and sharper contrast.
Document the optimal temperature for each drink type in a small notebook attached to the station. Over time, you may discover that certain beans taste better at slightly lower temperatures, and the three‑setting LED warmer makes fine‑tuning effortless. This systematic approach transforms a simple cup warmer into a precision tool that elevates the overall espresso experience.
Tips & Pro Tips
- Use flat‑bottomed mugs for optimal heat transfer; ceramic or stainless steel mugs perform best on the 4.1‑inch heating surface.
- Keep the LED indicator on during night‑time brewing; the soft glow helps locate the cup without turning on overhead lights.
- Periodically clean the glass plate with a damp cloth; residue can reduce heating efficiency.
- If you experience occasional flickering, verify that the power strip is not overloaded with other high‑draw appliances.
- For a minimalist look, conceal the power cord behind a decorative cable raceway that matches the station's finish.
Troubleshooting
Problem: The LED does not illuminate after selecting a temperature.
Solution: Ensure the warmer is plugged in and the auto‑shut‑off has not engaged. Press the side button for three seconds to reset the LED module.
Problem: Beverage cools rapidly despite the warmer being on.
Solution: Verify that the mug base is flat and fully contacts the heating plate. Consider switching to the Bearwind Coffee Mug Warmer, which provides a larger 4.1‑inch glass surface and four temperature settings up to 176 °F.
Problem: The unit shuts off before the timer expires.
Solution: Check that the auto‑shut‑off feature is not set to the default 4‑hour limit. Adjust the timer using the side controls to extend the active period.
Conclusion
Integrating an LED cup warmer into a compact DIY espresso station enhances both temperature control and visual appeal. By selecting a product such as the Kepwam Coffee Mug Warmer, preparing safe electrical connections, and configuring the appropriate temperature, one creates a seamless brewing environment. The additional tips and troubleshooting guidance ensure long‑term reliability, allowing coffee enthusiasts to enjoy perfectly warm drinks with a touch of ambient lighting.
Products Mentioned in This Guide
Frequently Asked Questions
What type of LED cup warmer is recommended for a compact DIY espresso station?
The guide recommends the Kepwam LED‑enabled coffee mug warmer as the primary choice.
Do I need a secondary warmer, and why?
A secondary warmer like the Bearwind model provides backup heat in case the primary unit fails, ensuring continuous temperature control.
What basic tools are required to install the LED cup warmer?
You’ll need a screwdriver, wire stripper, multimeter, heat‑resistant silicone pads or mounting brackets, and a surge‑protected power strip.
How can I add precise temperature control to the warmer?
Use an optional timer‑enabled warmer, which lets you set specific heating intervals for better temperature management.
Are there safety precautions I should follow during installation?
Yes, verify wiring with a multimeter, use heat‑resistant mounting materials, and connect the unit to a surge‑protected power strip to prevent overloads.